By Barry Johnson
As a landscaper I have often been asked to transplant established camellias or, advise on how it could be done. My first rule of thumb is never promise anyone that it can be done and that you can do it, sight unseen, over the phone. Otherwise Murphy’s Law will ensure that, upon arrival, you will be confronted with a monolithic, 100 year old specimen growing out of a rockery or, bursting out of a one metre wide garden bed bounded on all sides by concrete. There is a limit to everything and that goes double for me. I’m not just talking around the plant but, my physical capabilities. There are never any ironclad guarantees when moving any established plant and I’m certainly not qualified to provide miracles. As I have already alluded, the plant has to be of a size that is viable to move in the first place. If you have lots of money and can gain access with large excavating machinery, I suppose anything is possible. However, if this also means demolishing the house and your driveway to successfully extricate the root system then I think not.
In saying all this, compared to many other shrubs, camellias are one class of plant that doesn’t have an extensive root system when you compare it to it’s top structure. This can be compound by where it’s roots have had to travel to get moisture. Most camellias grown in a reasonable well watered garden situation keep their root structure close to home.
The first consideration when intending to move camellias is timing. The optimum time is just near the end of their flowering cycle e.g. late August. With Sasanquas this could also be mid winter. Camellias should be moved before their once a season, foliage growth spurt (after flowering). Another factor not well known to the general public is that camellias are relatively dormant during their flowering cycle. If you’ve decided the camellia is viable to move, the next thing to do select a site that is aspectually suitable for growing camellias eg. morning sun or protective dappled shade. The next priority is to thoroughly prepare it’s new home. That is, cultivate the existing soil well with non-alkaline well aged compost and manures. Do not use chicken manure or mushroom compost as they are quite alkaline.
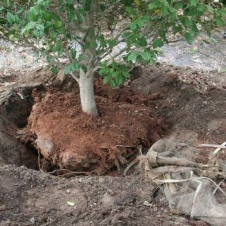
 If you have some time in advance of physically moving the plant, I would suggest the following procedure and this would particularly apply for larger specimens. Carefully excavate a narrow, moat-like trench (spade width x 1.5 depth) around the outer root line. This should be in the vicinity of the outer foliage line. Stake the plant if it looks to be unstable. Immediately back-fill the trench with a 50/50 mix of quality soil and pea straw or lucerne. With secateurs, neatly re-cut any roots that may have been roughly cut with the spade (hopefully, not too many).This advanced digging procedure could be undertaken from May until the end of July.
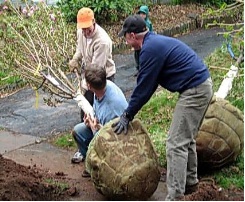
The moating technique creates controlled medium environment for new roots to start evolving during the transition stage and minimises the chances of ‘sudden impact shock’ with the all in one removal technique. After saying all this, camellias tend to be one of the most movable plants after the viability criteria has been satisfied. When the time actually arises for the plants total removal, the temporary, moated, growing medium can be carefully removed and the camellia can be under-dug to facilitate total removal. The easiest method of getting the plant to the new site is by placing the root ball on a bag or tarpaulin and dragging it to the new site, if it wont fit into a wheelbarrow. The careful removal of excesses of heavy garden soils embedded around the roots will also relieve some of the transportation weight factor.
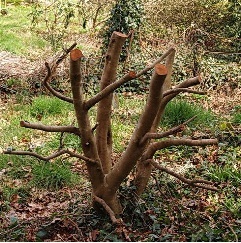
The upper branch-work of the camellia should be cut be cut back by at least half, even if it means going back to bare branches. This is done because the (possibly) severed and disturbed root system probably will not be able to sustain the same amount of foliage growth as before. In other words, the camellia needs to rejuvenate itself above and below ground in it’s new home. Once ensconced in its new site correct aftercare is essential, with particular attention to adequate mulching, watering and feeding. (Refer to website article re ‘Pruning of Camellias’.
I have had situations where I have been forced to remove camellias so that major redevelopments and renovations can take place. Sometimes this also means that the camellias cannot be resited immediately. To facilitate this dilemma, I have extricated camellias, tidied up the roots, pruned the tops and wrapped the root ball up similar to a  plum pudding in a double layer of hessian. Just before tying up the root ball I fill the hessian ball with terracotta and tub mix potting soil to eliminate any air pockets. I then temporarily store the ‘on hold’ camellias in a kind, morning sun environment and most importantly keep the root ball well watered. Occasional waterings with a seaweed tonic would also assist new root development and minimise shock.
Still working on the assumption of viability but, you need to move the camellia yesterday. Apart from properly preparing a suitable site, as previously stated, if the plant is of considerable size, you need to stridently prune it. Carefully dig up the camellia with as little damage to the roots as possible. Replant the camellia and water in and regularly with a seaweed tonic such as ‘Seasol’ or, ‘Maxicrop’.
I am almost reluctant to state this but, I have, on occasion used my four wheel drive to carefully extricate established camellias. When I say carefully, I mean, using soft, webbing winch strapping and protective bagging around the trunk, I use the vehicle to apply pressure to the plant and assist in locating embedded roots while under-digging plant. Of course, this method only applies if you have open access in the first instance.
